# JupyterHub
URL: /en/docs/web-apps/jupyterhub
***
## title: JupyterHub
**JupyterHub** is an open-source platform designed to provide multi-user access to Jupyter Notebook environments.
It allows to manage and scale the deployment of interactive computational environments for multiple users, making it ideal for educational institutions, research labs, and enterprises that need to support collaborative data science and scientific computing.
**JupyterLab / Jupyter Notebooks** are web applications that enable you to create and share documents containing live code, equations, visualizations, and narrative text. They are widely used in data analysis, machine learning, and other computational tasks due to their interactive nature and ability to combine code execution with rich text explanations.
## Accessing JupyterHub
To access JupyterHub on the [hub.cloud.e-infra.cz](https://hub.cloud.e-infra.cz/) platform, you must be a valid member of MetaCentrum.
## Starting JupyterLab / Jupyter Notebook
### Starting Server
To launch a default JupyterLab environment, simply click on the `My Server` button.
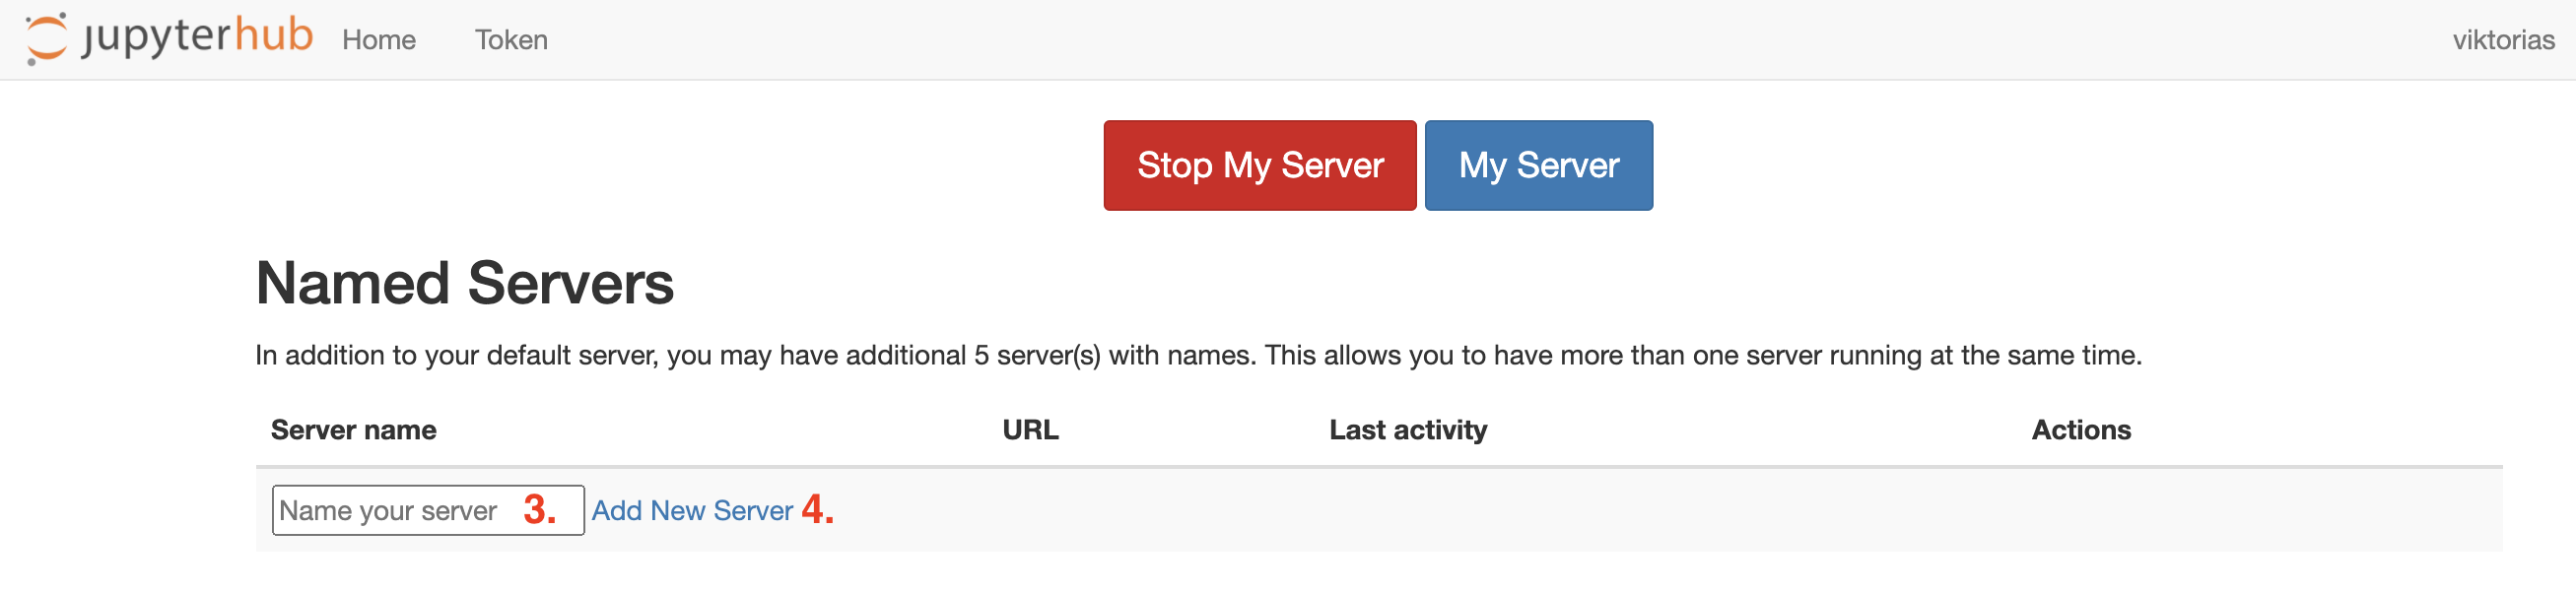
If you prefer to create a custom JupyterLab with a personalized name, follow these steps:
* Choose short, unique and descriptive name for your server to ensure easy identification.
* Click on `Add new server` to proceed with the creation of your customized JupyterLab environment.
### Choosing Image
We provide a range of pre-configured Docker images to accommodate various computational requirements:
* **Simple Jupyter Images**, including versions that support AI-powered chat assistance to aid with coding tasks
* **R Images**, which enable you to use different versions of RStudio, also featuring AI capabilities
* **TensorFlow and Pytorch Images**, optimized for machine learning and deep learning applications
* **Matlab Images**, allowing you to access a graphical, interactive instance of Matlab
* **Folding images**, specifically designed for special use cases involving Colabfold or ESM Fold
* Alternatively, you can also use your own **custom image**
> You can choose to build your own image with all dependencies and sotware you need. However, don't forget to include whole jupyter stack, otherwise the the deployment will not work. We recommend building from [existing image](https://jupyter-docker-stacks.readthedocs.io/en/latest/using/selecting.html) which already incorporates all nexessary software. If you choose custom image, you have to provide image name together with its repo and optional tag --- input text in format `repo/imagename:tag`. If you build your own image, you have to make sure repository is public. If you don't know what repository to choose, we maintain our own docker registry which you can freely use and does not require any further configuration. More information on registry is available [at a harbor site](../docker/harbor).
### Choosing Storage
#### Default Persistent Storage
By default, every notebook runs with persistent storage mounted to `/home/jovyan`. Therefore, we recommend to save the data to `/home/jovyan` directory to have them accessible every time notebook is spawned.
You can create a new one or choose to mount any already existing storage (to /home/jovyan) instead of creating a new one which enables sharing data across spawns and instances.
However, you can choose to delete existing storage which will result in losing all the data from it.
#### MetaCentrum Home Integration
You can mount your MetaCentrum home directory or project directory to access your files. Please select the desired home from the available options. Note that currently, only one home directory can be mounted per notebook. In the hub, your home directory is located in `/home/meta/{meta-username}`.
❗️ If you choose storage where you do NOT have a home directory, the spawn process
will fail. Please, make sure you are choosing storage where your home exists. If you are not sure about home location, contact IT Service desk who will help.
### Resource Allocation
Each Jupyter notebook can request 3 types of resources --- CPU, memory, GPU --- up to the set limit. Because we want to support effective computing, we have implemented a simple shutdown mechanism that applies to each notebook instance. Please, read the mechanism description below.
#### CPU
You are guaranteed **1 CPU** and can request up to **32 CPU** limit. Resource limits represent a hard limit which means you can't use more than set amount for that specific instance. If computation inside notebook requires more CPUs than assigned, it will not be killed but throttled --- the computation will continue, perhaps just slower.
#### Memory
You are guaranteed **4G of RAM** and can request up to **256G of RAM**. Resource limits represent a hard limit which means you can't use more than set amount for that specific instance. If computation inside notebook consumes more memory than assigned, it will be killed. The notebook will not disappear but the computation will either error or abruptly end.
#### GPU
It is possible to utilize GPU in your notebook, you can request whole GPU or MIG GPU.
* For whole GPU, **using GPU requires particular setting (e.g. drivers, configuration) so it can be effectively used only in images with GPU support.** (marked as `...with GPU...` in the selection menu). If you assign GPU with any other image, it will not be truly functional.
* For MIG GPU, see [NVIDIA MIG](https://www.nvidia.com/en-us/technologies/multi-instance-gpu/) documentation about MIG technology. It is possible to request up to 4 parts of 10GB MIG of NVIDIA A100/80GB card using `10GB part A100` option and up to 4 parts of 20GB MIG of NVIDIA A100/80GB card using `120GB part A100` optino. GPU memory is HW limited so there is no problem that someone else could overutilize requested amount of the resource. Individual MIG parts (up to 4) act as isolated GPUs so to utilize more than one MIG part, multi-GPU computation has to be setup in an application.
* Actually free GPU resources are shown for information.
## Working in JupyterLab environment
### Using RStudio
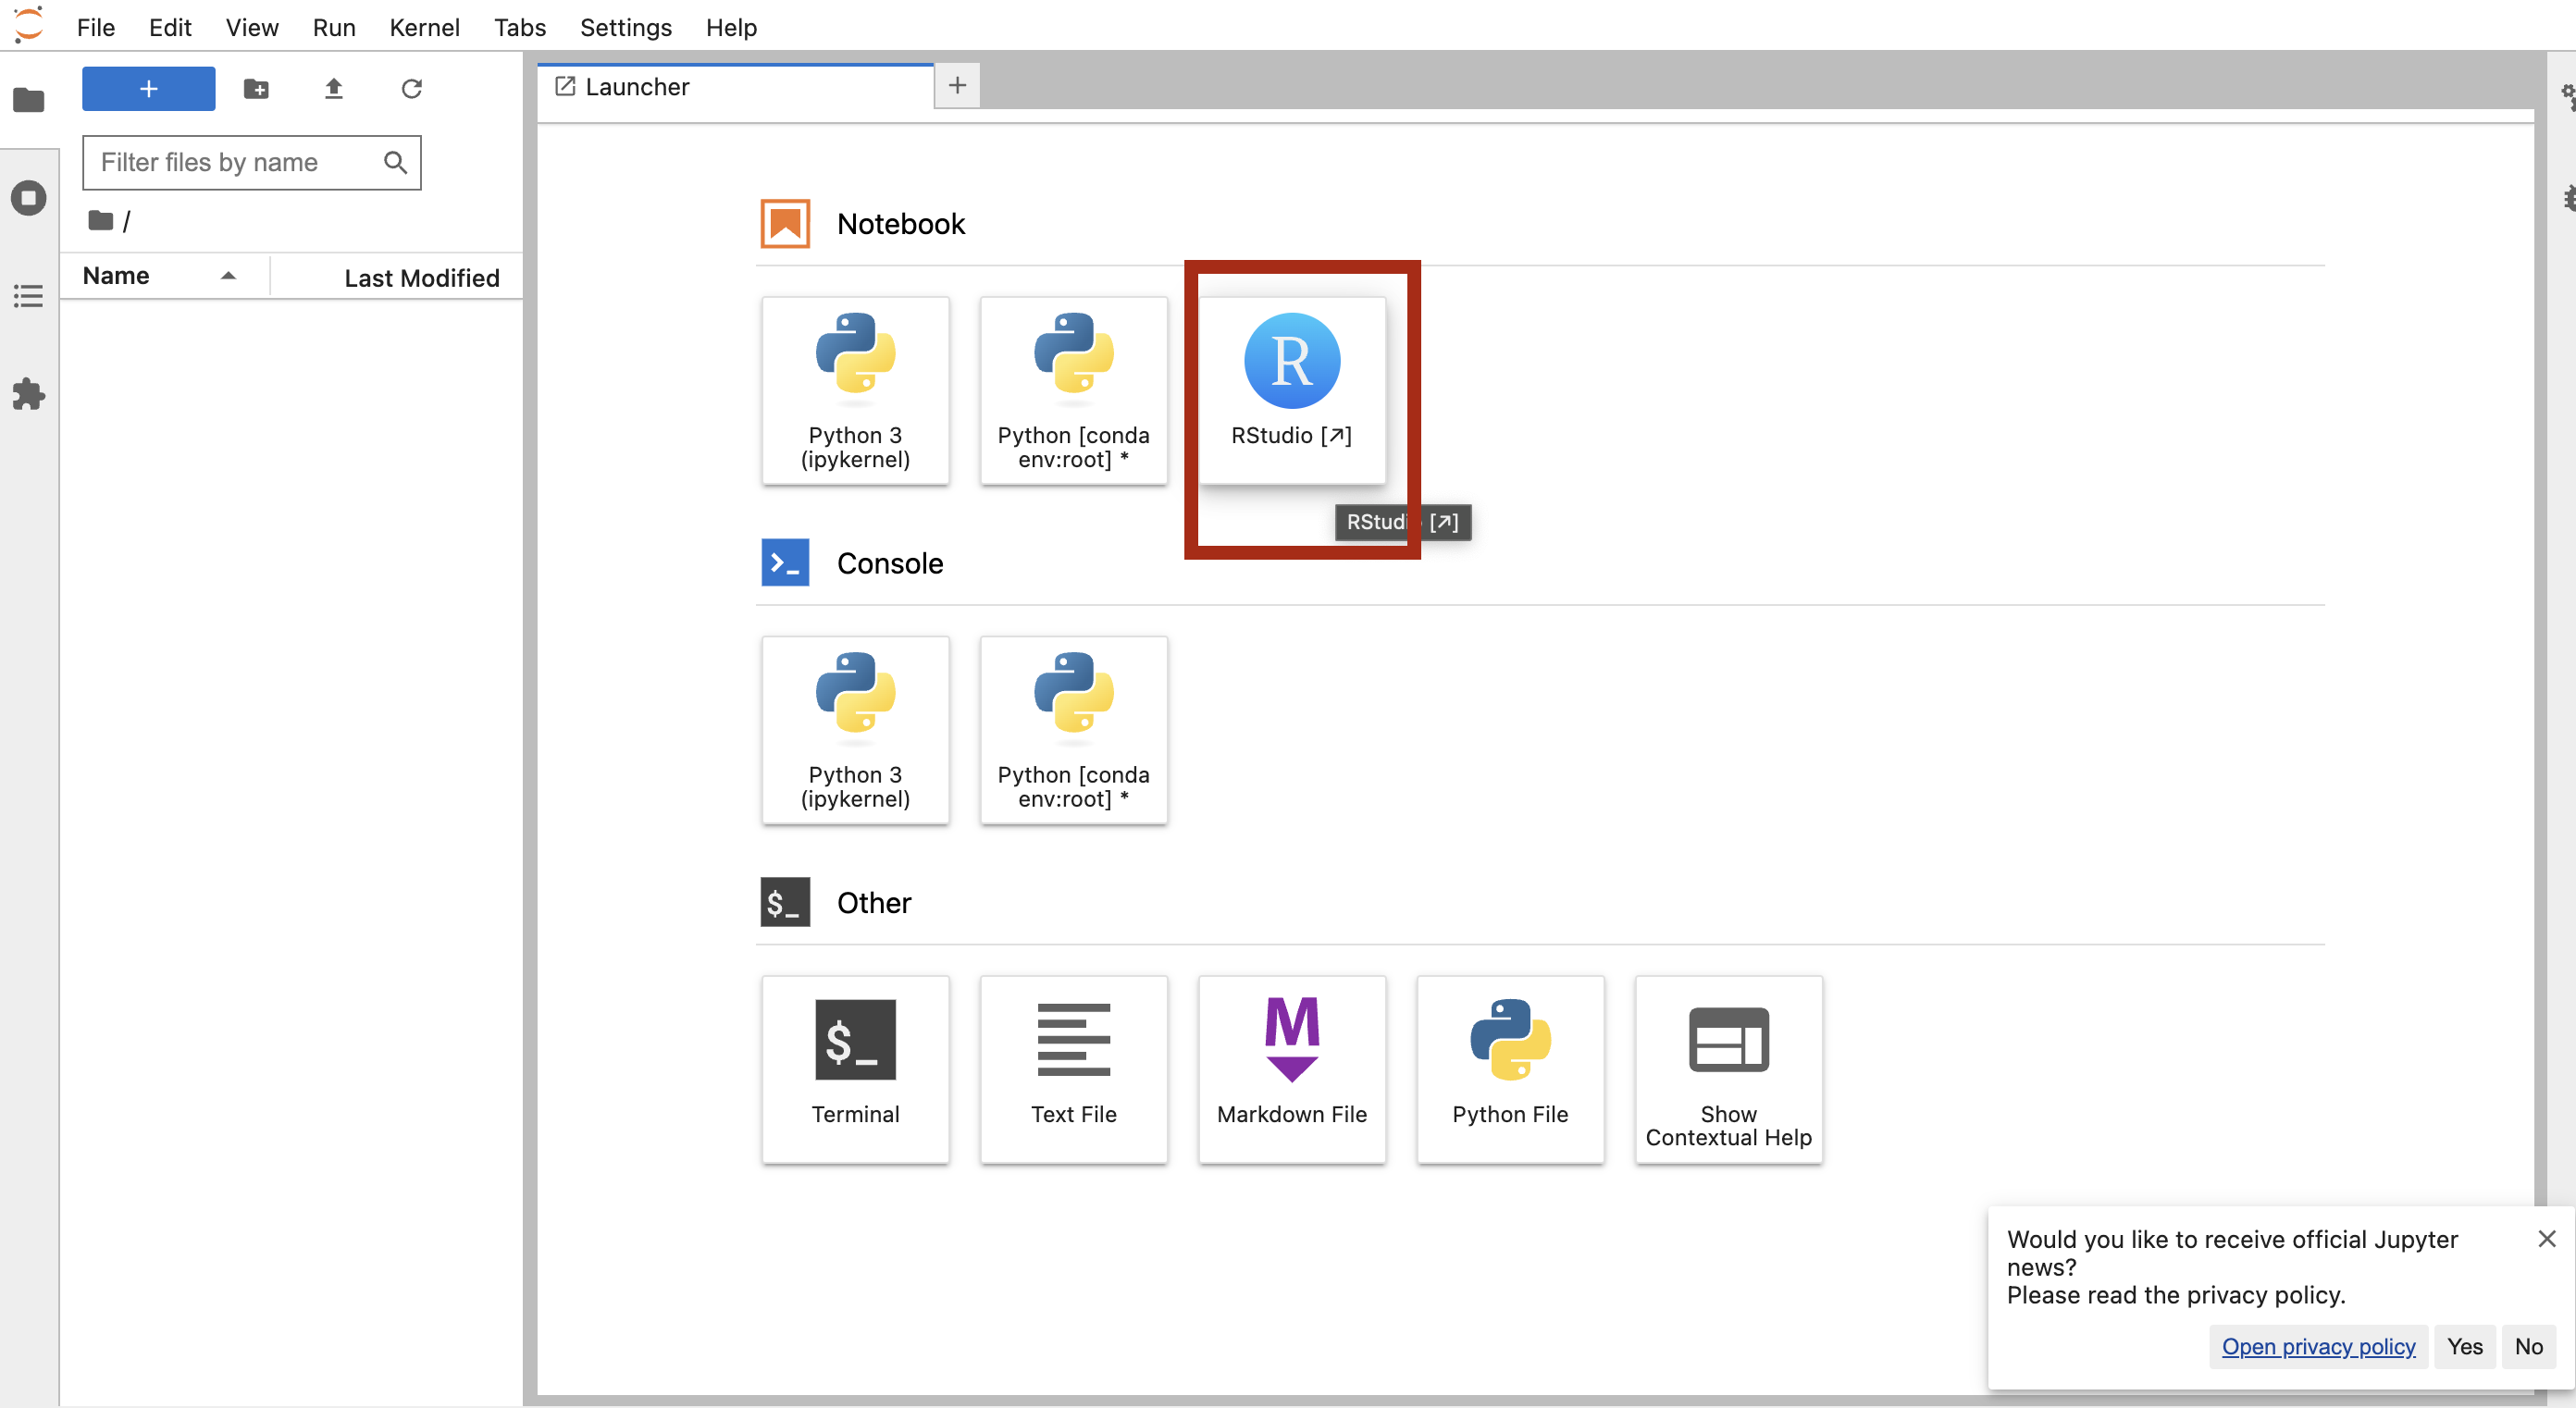
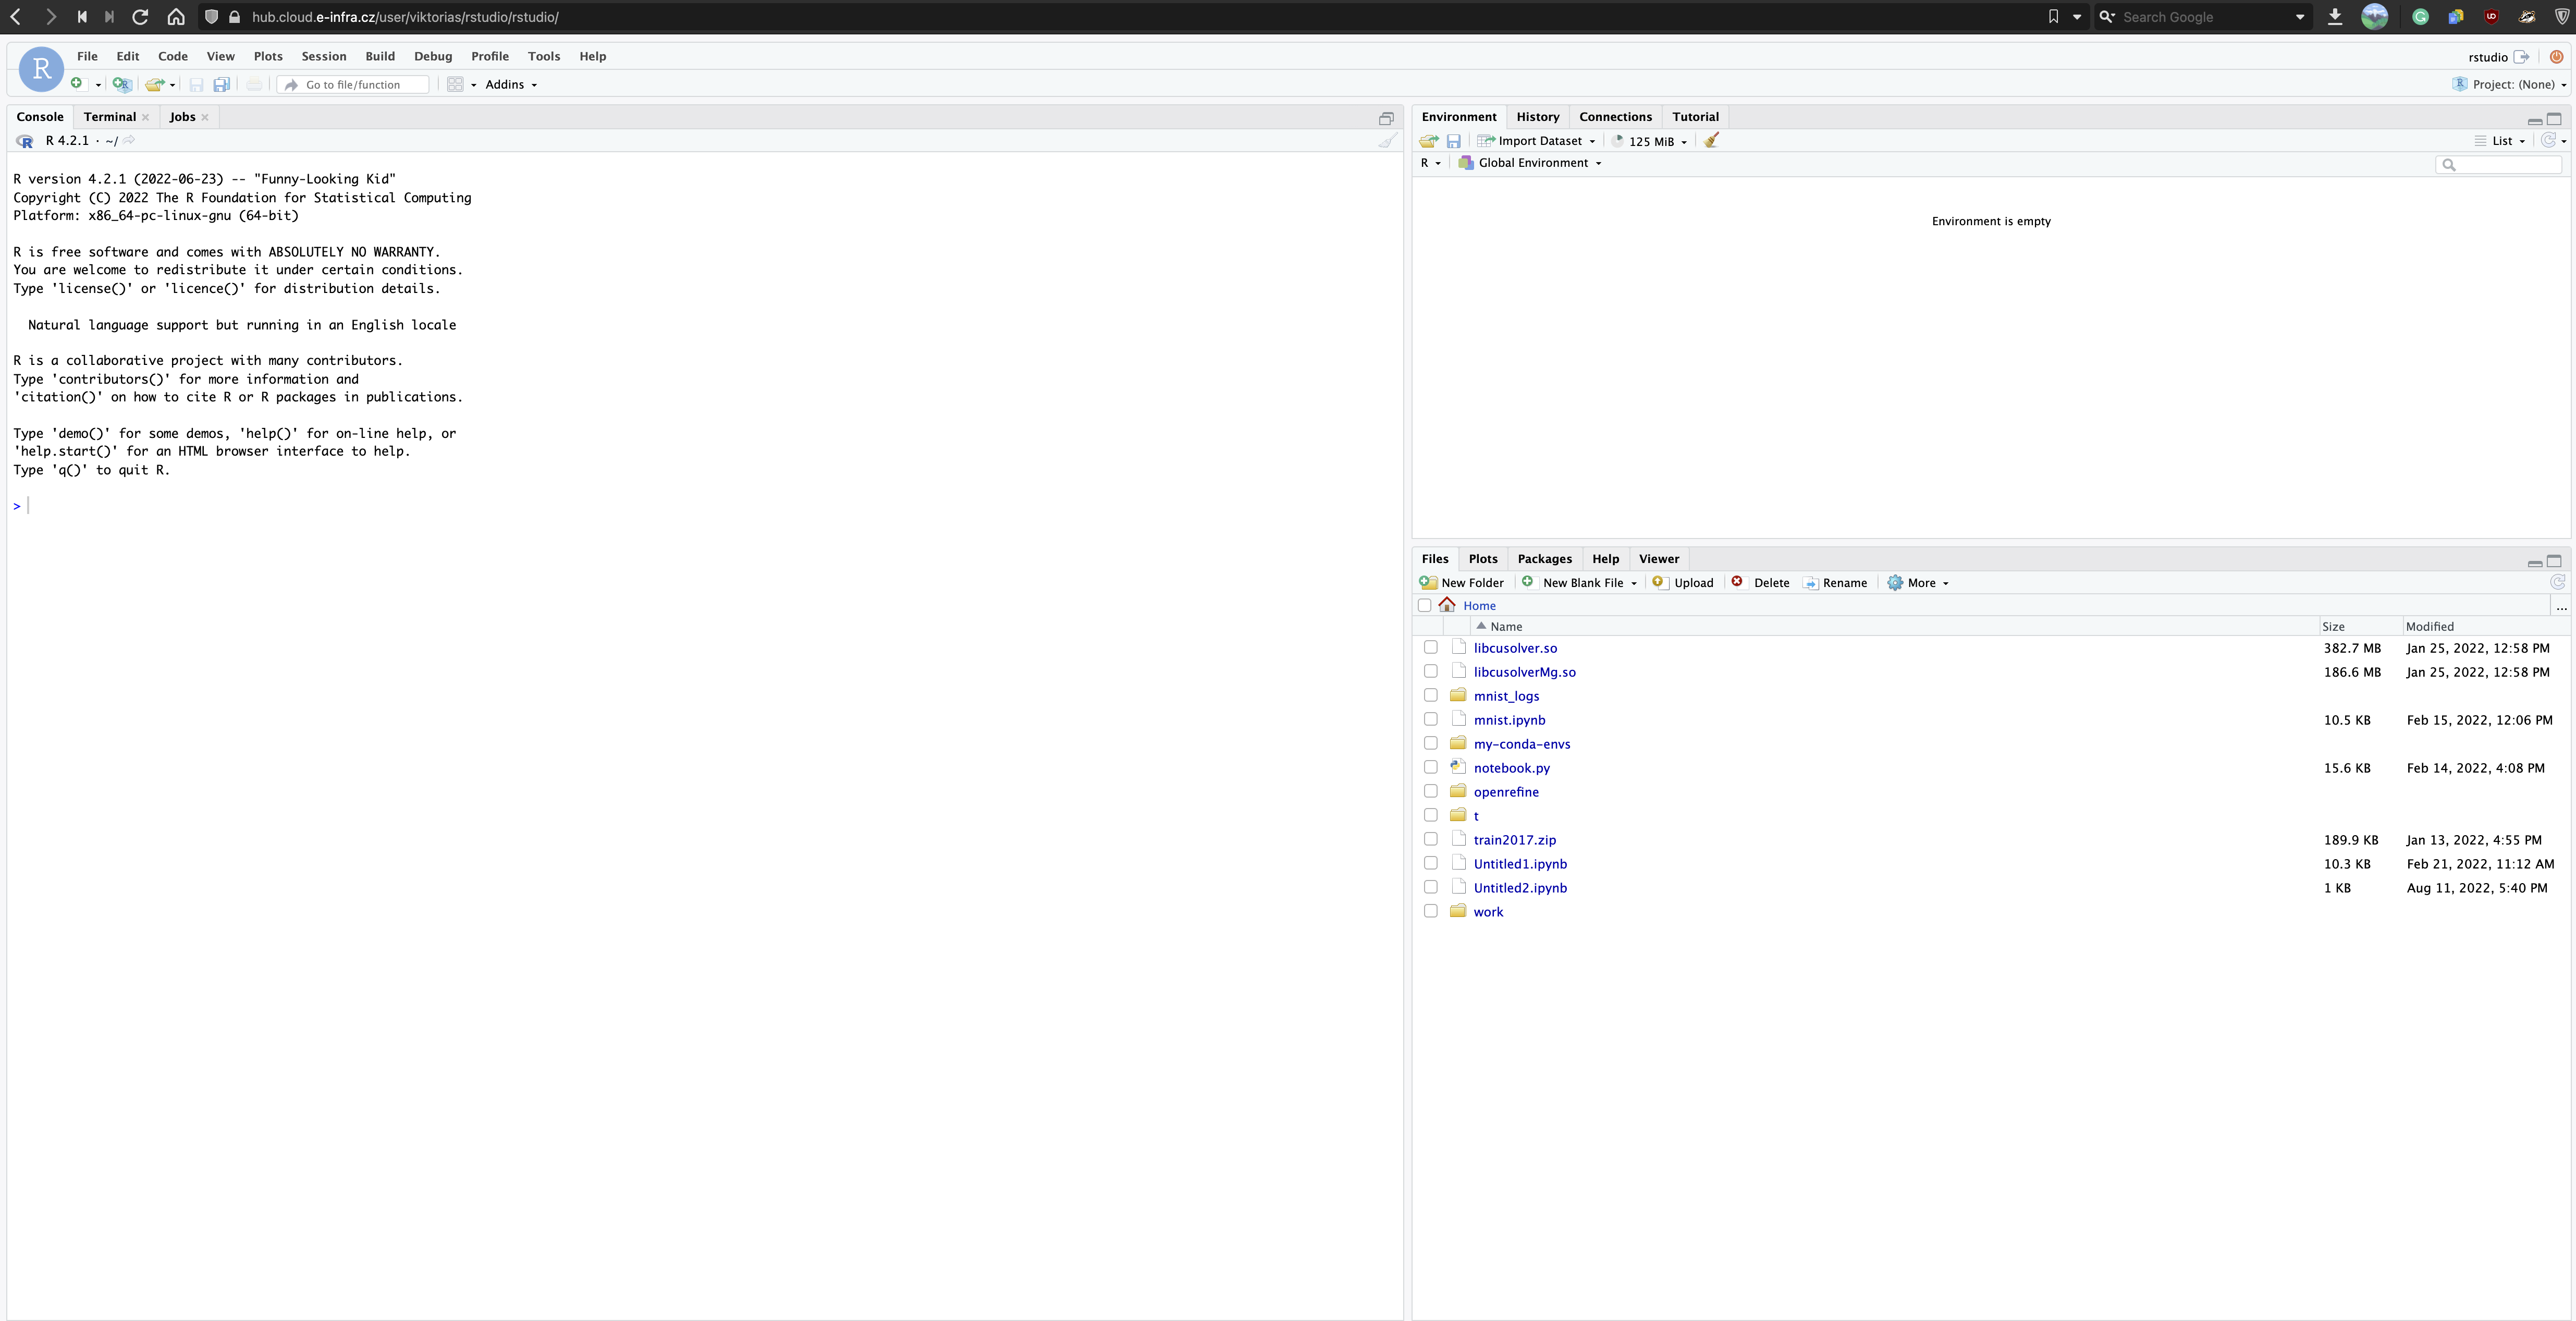
If you choose RStudio, you will be redirected to jupyter lab. It is then necessary to click on `RStudio` icon to be redirected to the RStudio environment.
### Using Matlab
Similarly, if you select Matlab image, click the `OpenMatlab` icon to access Matlab environment.
### Other Images
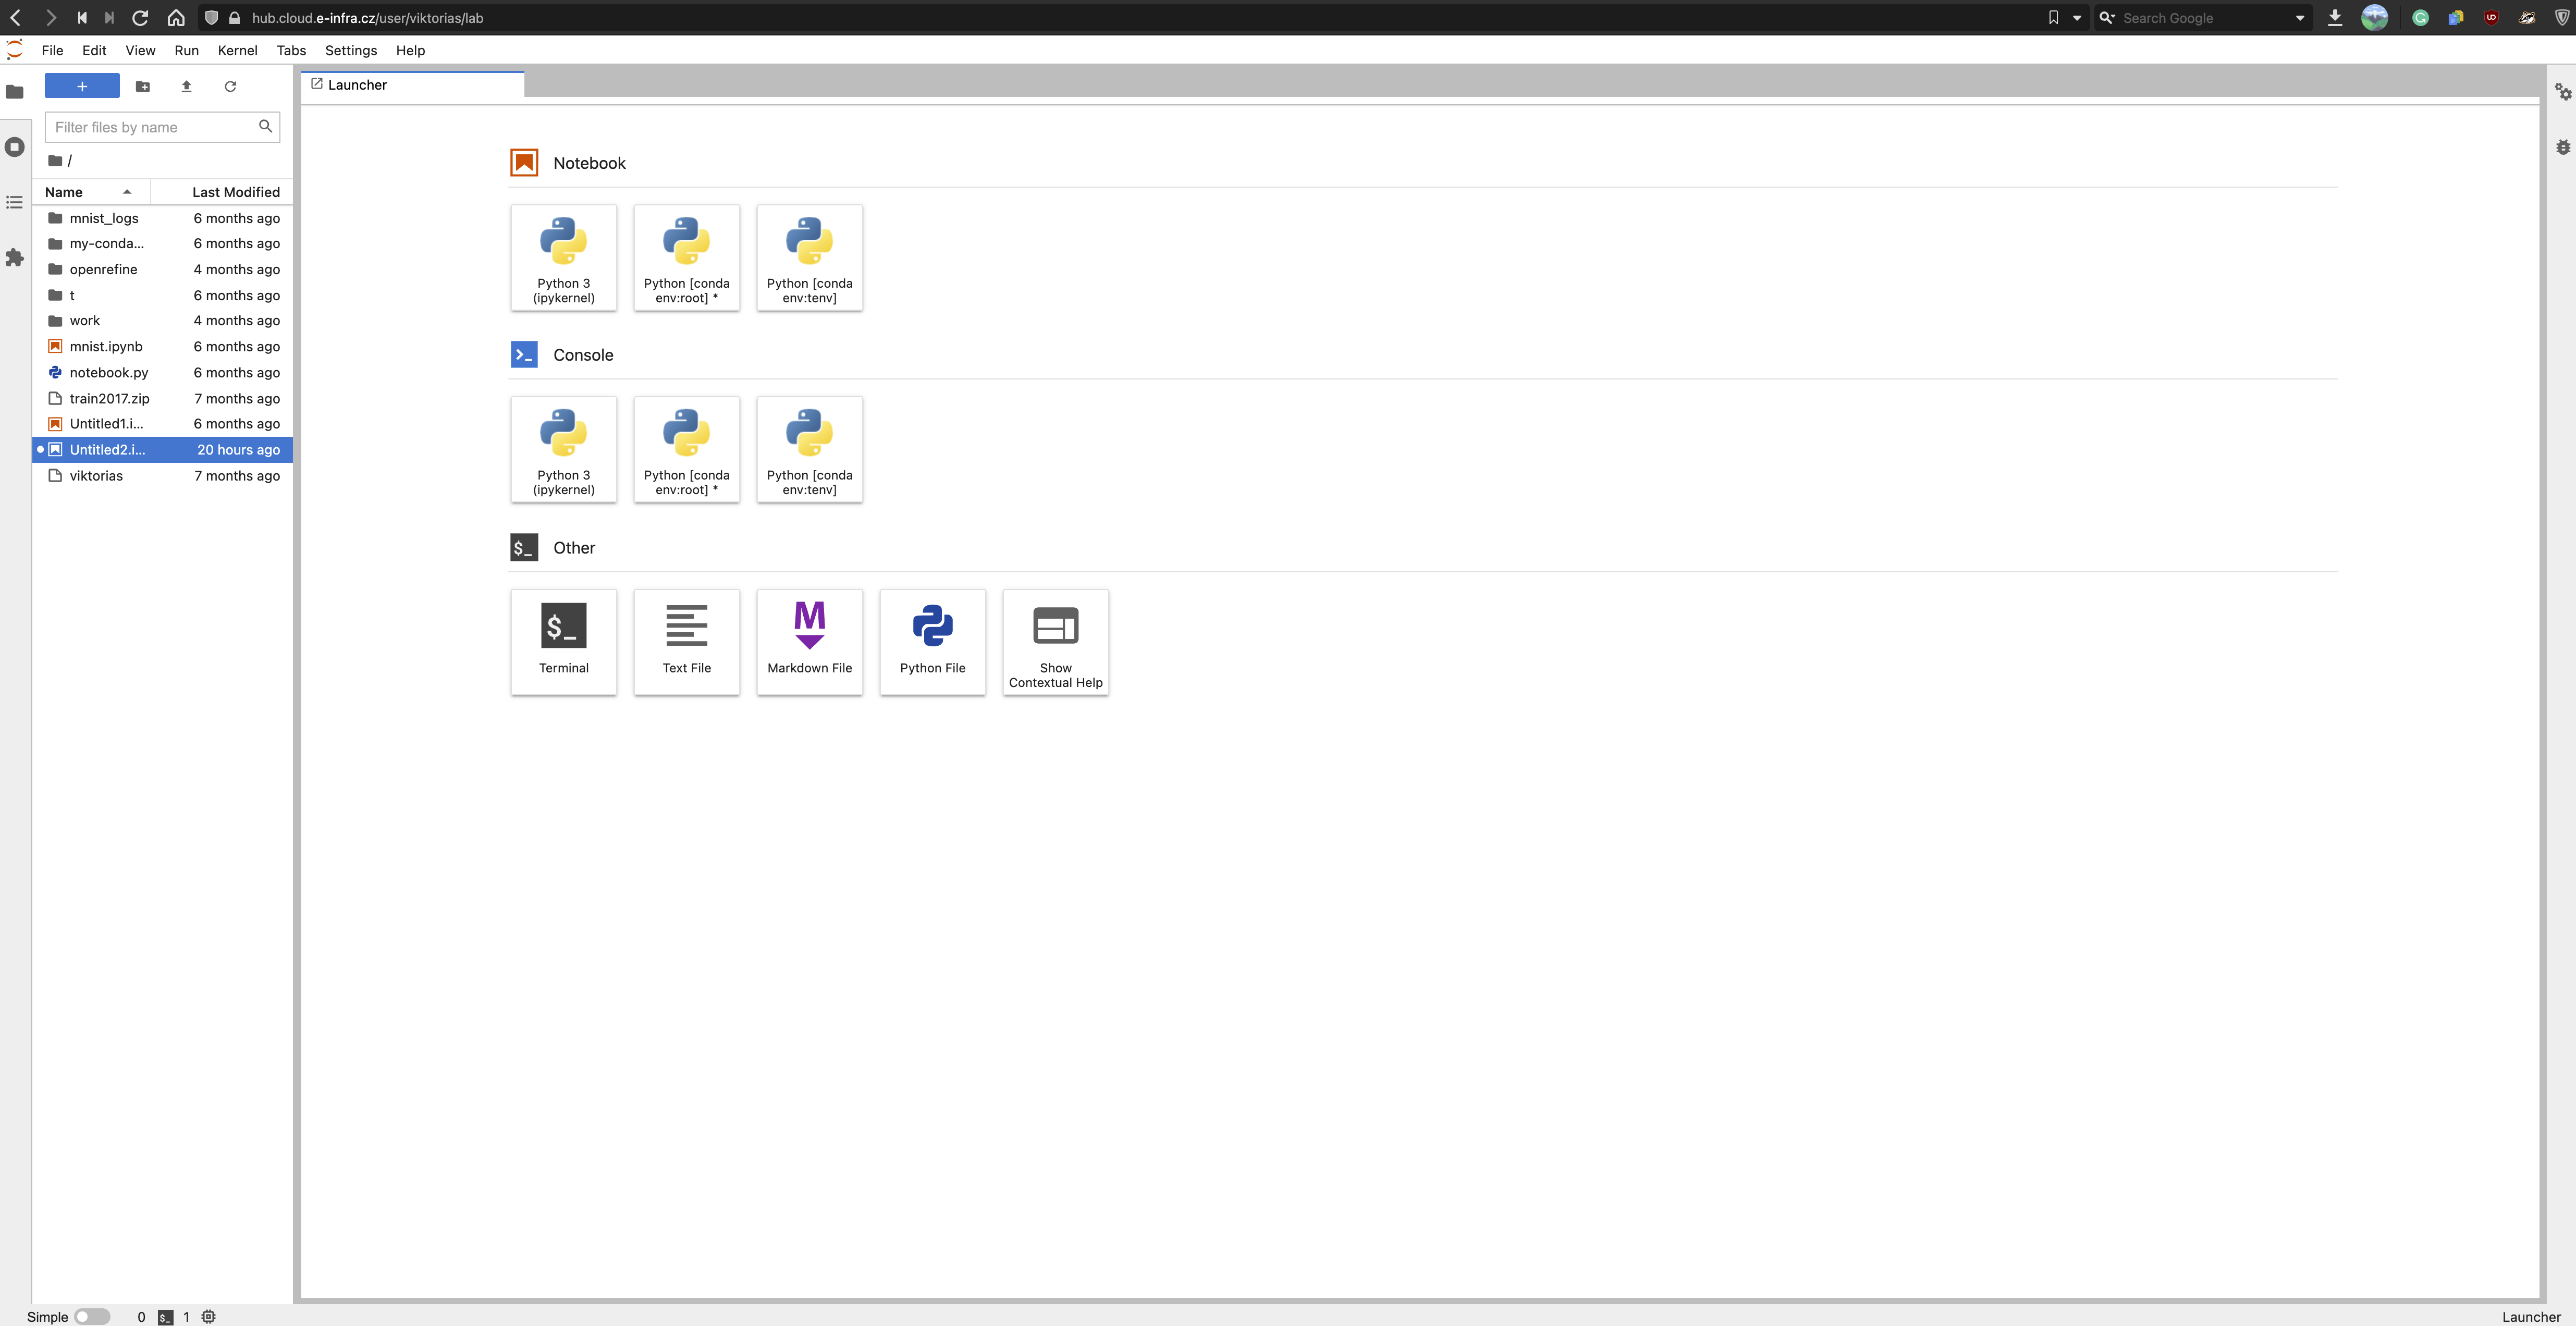
Other images are redirected to the `/lab` version of JupyterHub.
## Resource utilization and Shutdown Mechanism
To promote effective computing, unused notebooks may be deleted based on resource usage. We have implemented a simple mechanism that decides if your notebook instance will be deleted. It performs evaluations once a day.
If **at least 1 GPU** was requested, the mechanism checks GPU usage and does not care about CPU usage (GPU is a *more expensive* resource). After 2 days of \<0.005 GPU usage, the notebook instance is deleted. The threshold `0.005` was chosen because this number is truly insignificant and means no usage.
If **no GPU** was requested, the mechanism checks only CPU usage. After 4 days of \<0.1 CPU usage, the notebook instance is deleted. The threshold was chosen based on data collected by monitoring --- CPU usage below 0.1 suggests that the notebook just exists and no computation is performed.
The mechanism works for both ways as following:
> Notebook's CPU usage is measured over 24h and is calculated as the average of notebook CPU usage (in CPU seconds) over 5-minute-long segments. The final maximum is chosen from all segments. If the resulting maximum *equals to zero/under 0.1*, the notebook instance is internally marked with "1" as the first warning. If usage is above 0.1, nothing happens.
>
> Notebook's GPU usage is measured over 24h and is calculated as the average portion of time graphics engine was active over 5-minute-long segments. The final maximum is chosen from all segments. If the resulting maximum *equals to zero/under 0.005*, the notebook instance is internally marked with "1" as the first warning. If usage is above 0.005, nothing happens.
>
> Next run performs the same but if maximum:
>
> * is still less than 0.1 for CPU (0.005 for GPU), counter is increased by one. If counter reaches `threshold+1` (e.g. for CPU, 5 as 4 days have already passed), instance is deleted.
> * changes from under the threshold above it, the mark is completely removed (you apparently started using notebook again).
> * is over the threshold, nothing happens.
### Low usage notification
If the notebook is marked for deletion, you will receive an e-mail informing about the situation for every warning until instance is truly removed. You will get an e-mail informing about deletion as well. You are not forced to do anything about instance if you receive an email --- if the usage does not go up, it will be deleted. We recommend saving the results or copying them elsewhere if you receive a warning. The email is sent to the address configured in your MetaCentrum account as a preferred address.
## Managing JupyterHub
All of your named server are accessible under `Hub Control panel` where you can manipulate with them (create, delete, log in to).
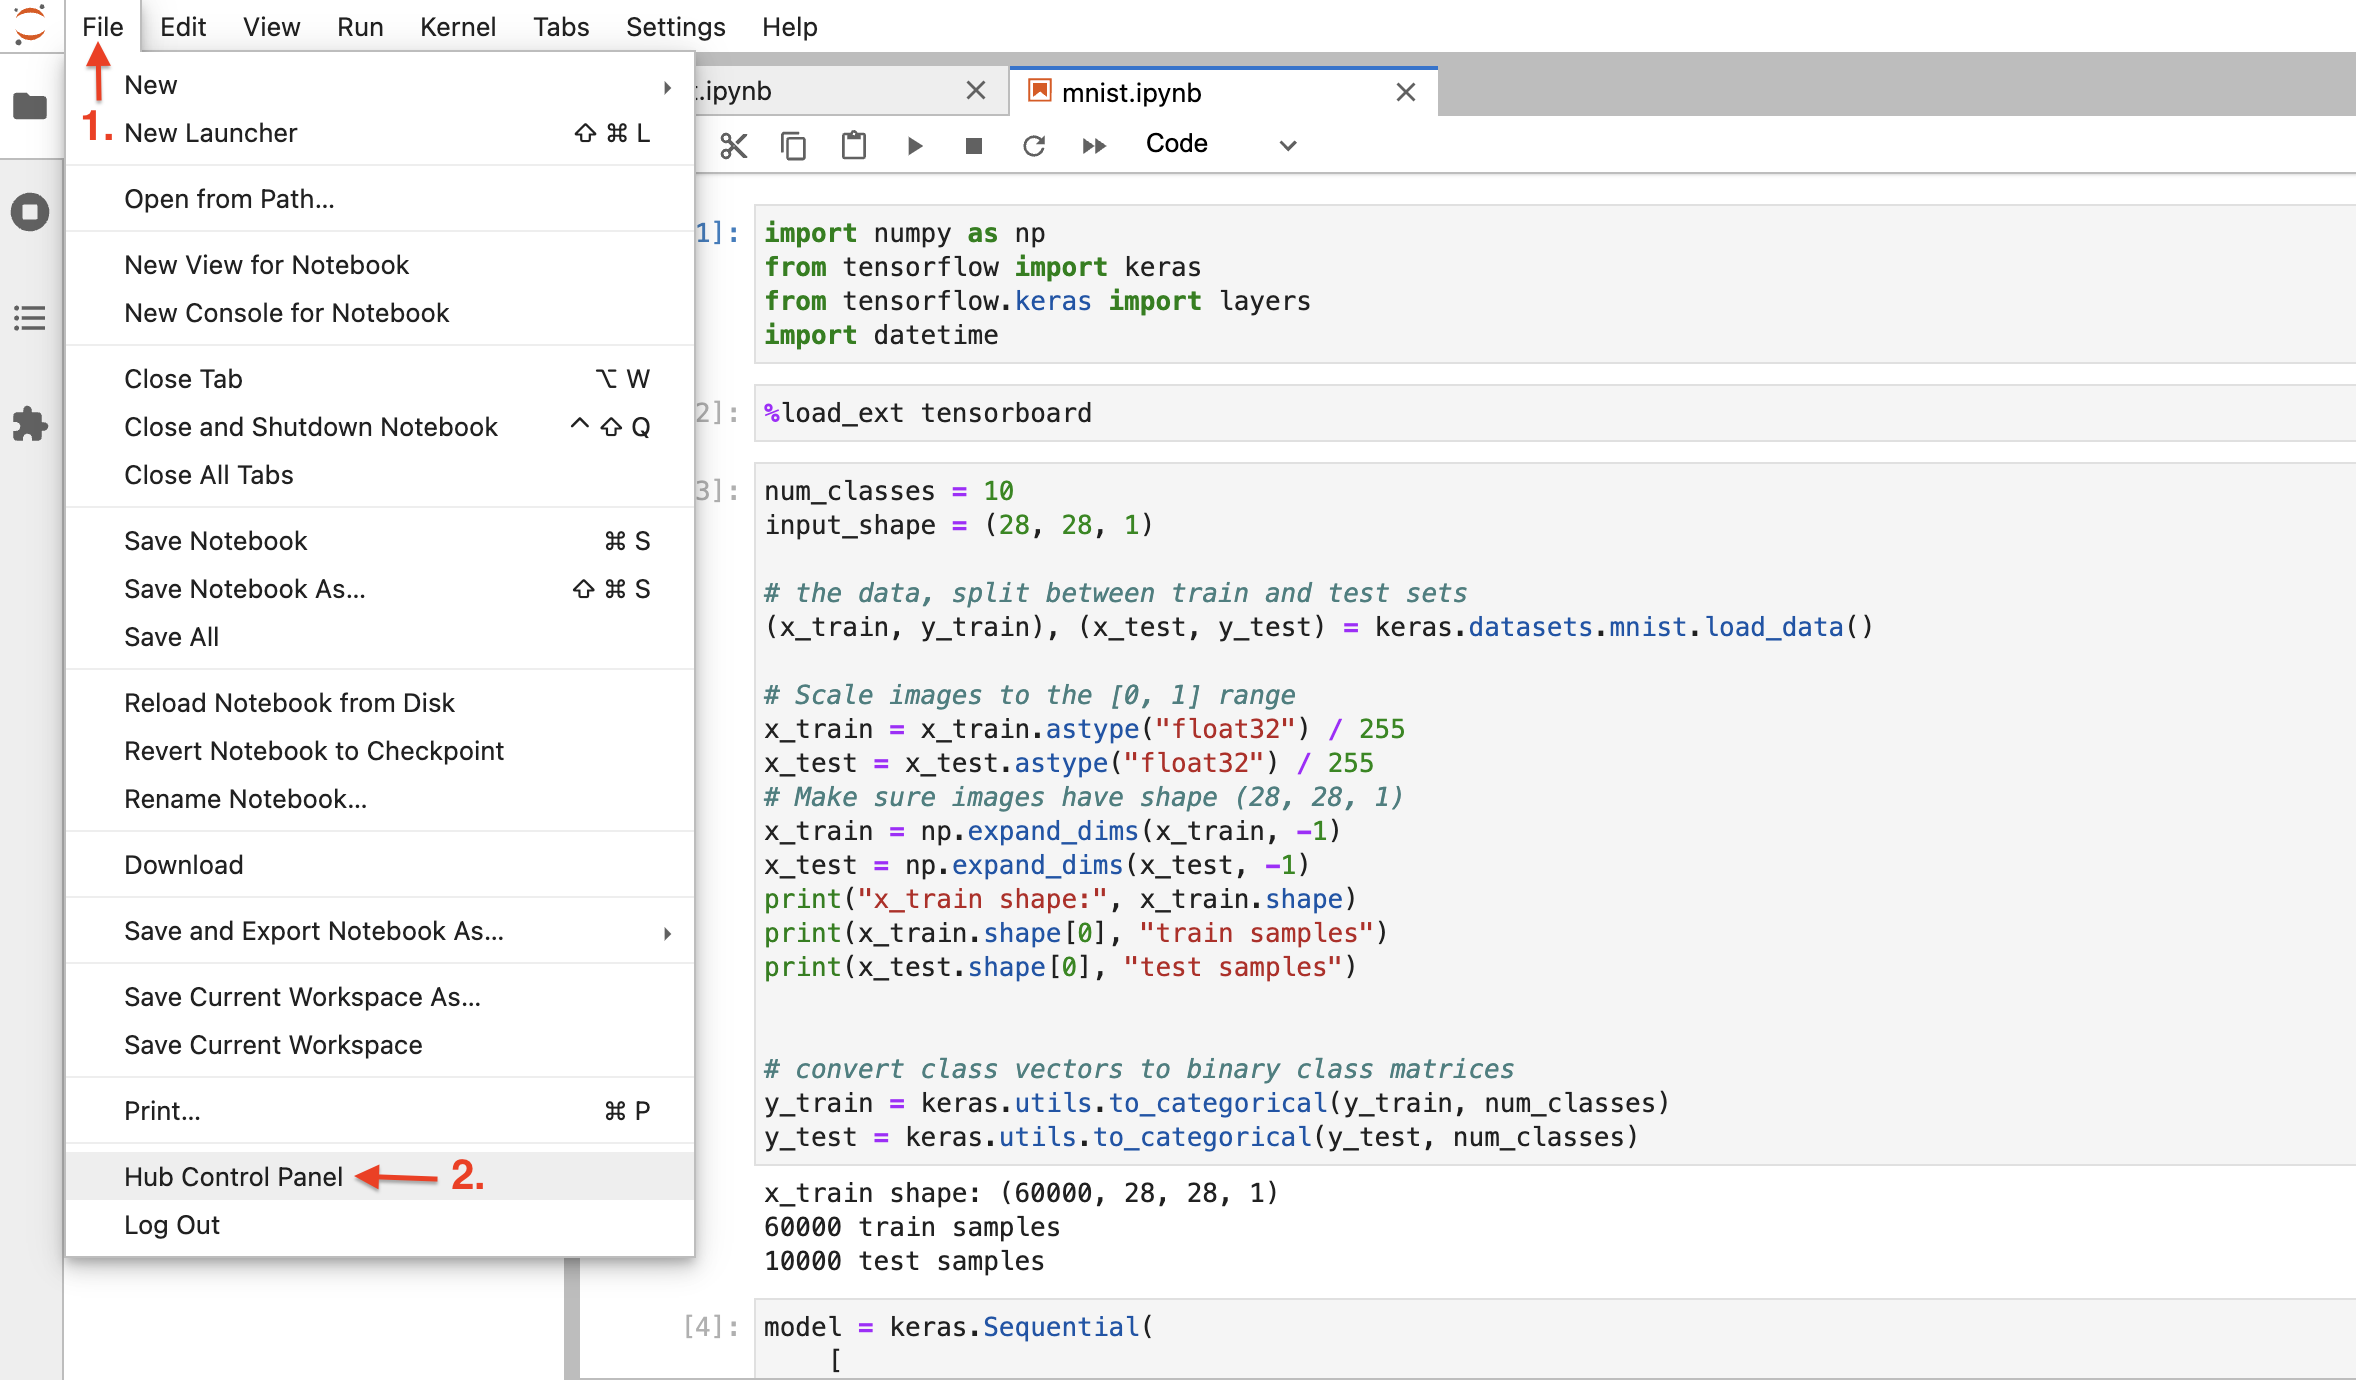
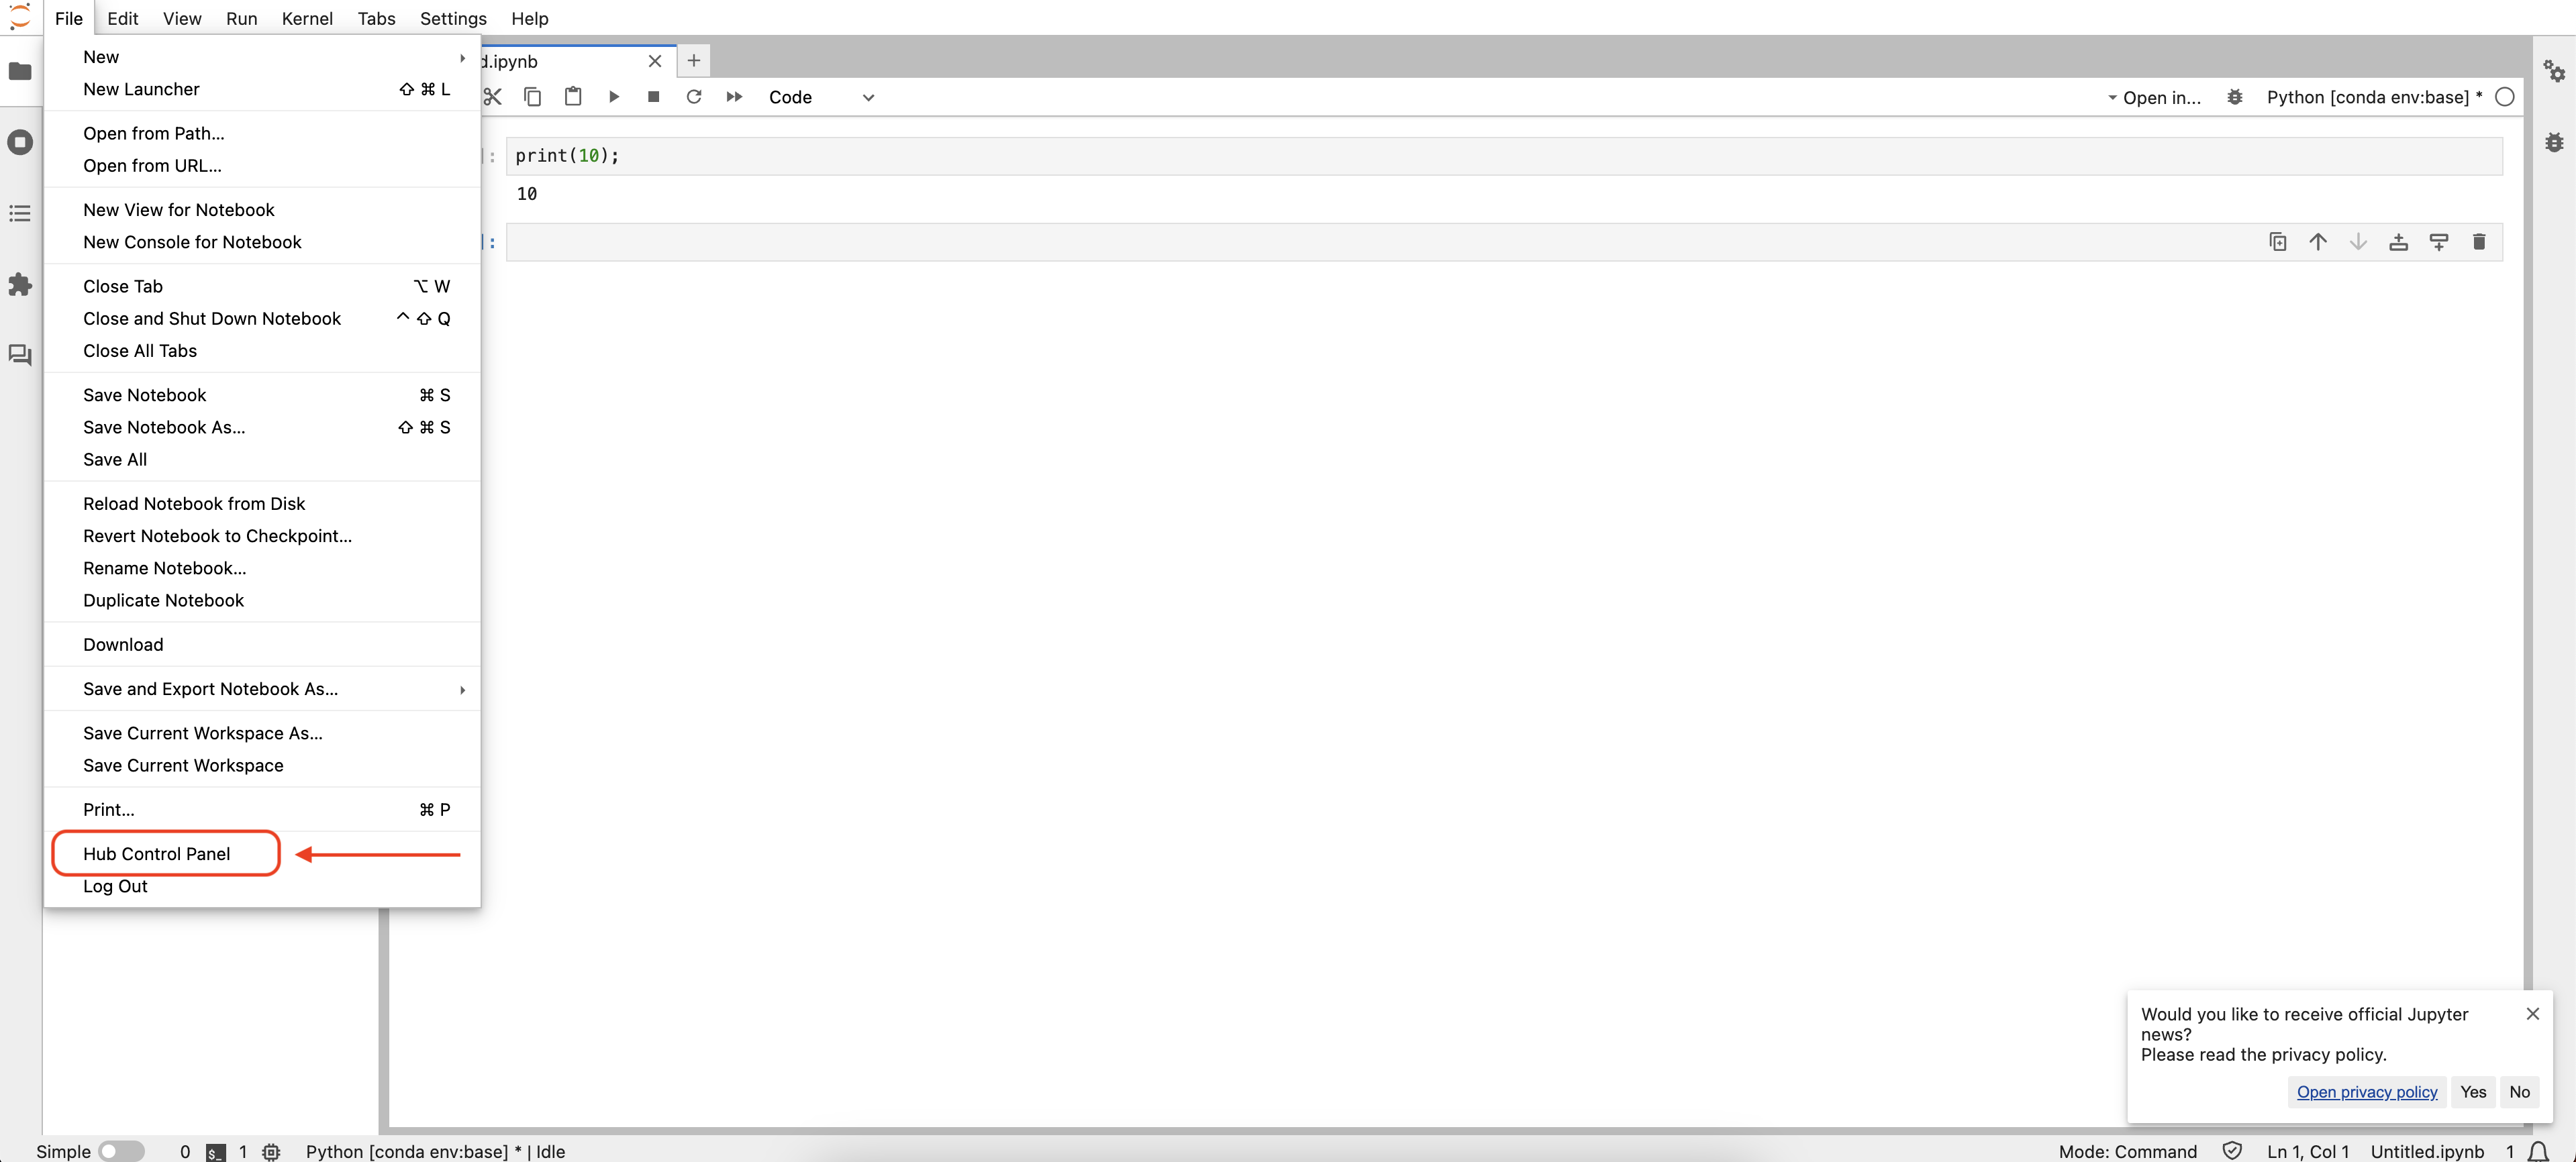
Whenever you need to manage your notebooks from JupyterLab environmnent, start JupyterHub environment accessing `File` → `Hub Control Panel` in the top left corner.
Here you can add new notebooks, stop, or delete them.
Alternatively, you can manage running instances at [https://hub.cloud.e-infra.cz/hub/home](https://hub.cloud.e-infra.cz/hub/home).
### Deleting JupyterNotebook Instance
In the top left corner, go to `File ` → `Hub Control Panel`. If you have multiple instances, click on `Stop` next to the instance name you want to delete. Wait till blue button `Delete` appears and click on it. If you have only one server, there will be big `Stop My Server` button in the upper part of the page. Click on it. In a couple of seconds, your container notebook instance will be deleted (stop button disapperas). If you need to spin notebook instance again, fill in the `Server name` and click on `Add new server`, you will be presented with input form page.
### Add Servers
JupyterHub allows spawning more than one notebook instance; actually you can run multiple instances of various images at the same time. To do so, in the top left corner, go to `File` → `Hub Control Panel`. Fill in the `Server name` and click on `Add new server`, you will be presented with input form page.
### JupyterNotebook Sharing
If you want to share a notebook with another user or use it from another browser session, you need to open `Hub Control Panel` as can be seen below:
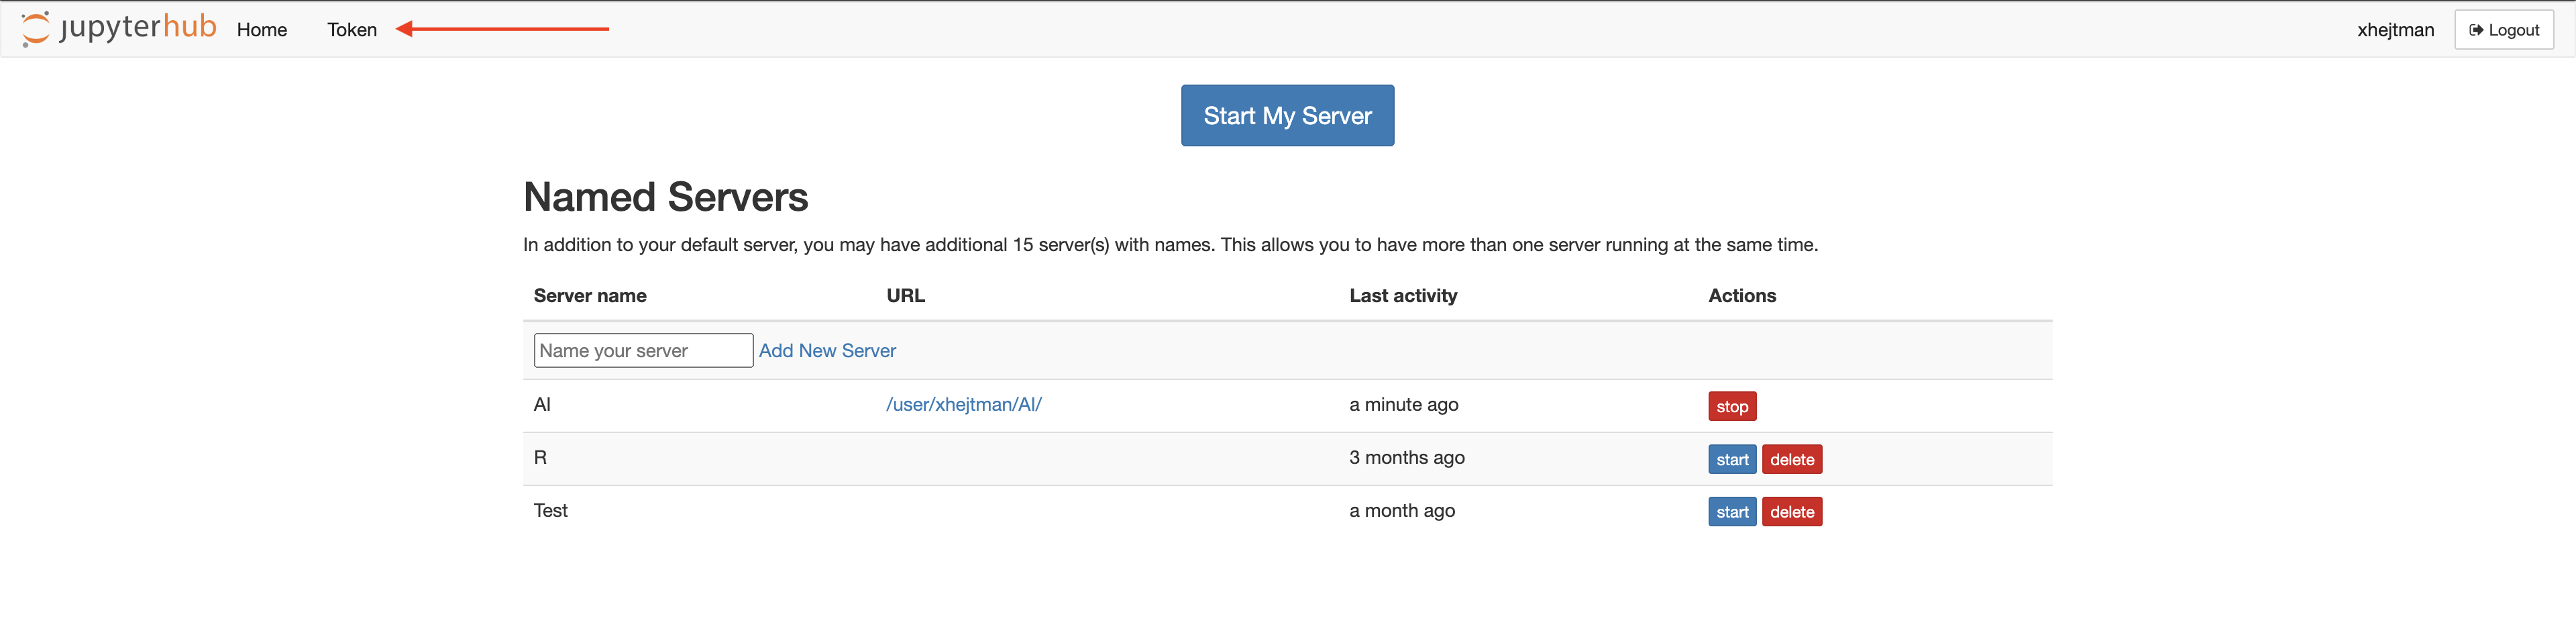
Then select the `Token` menu:
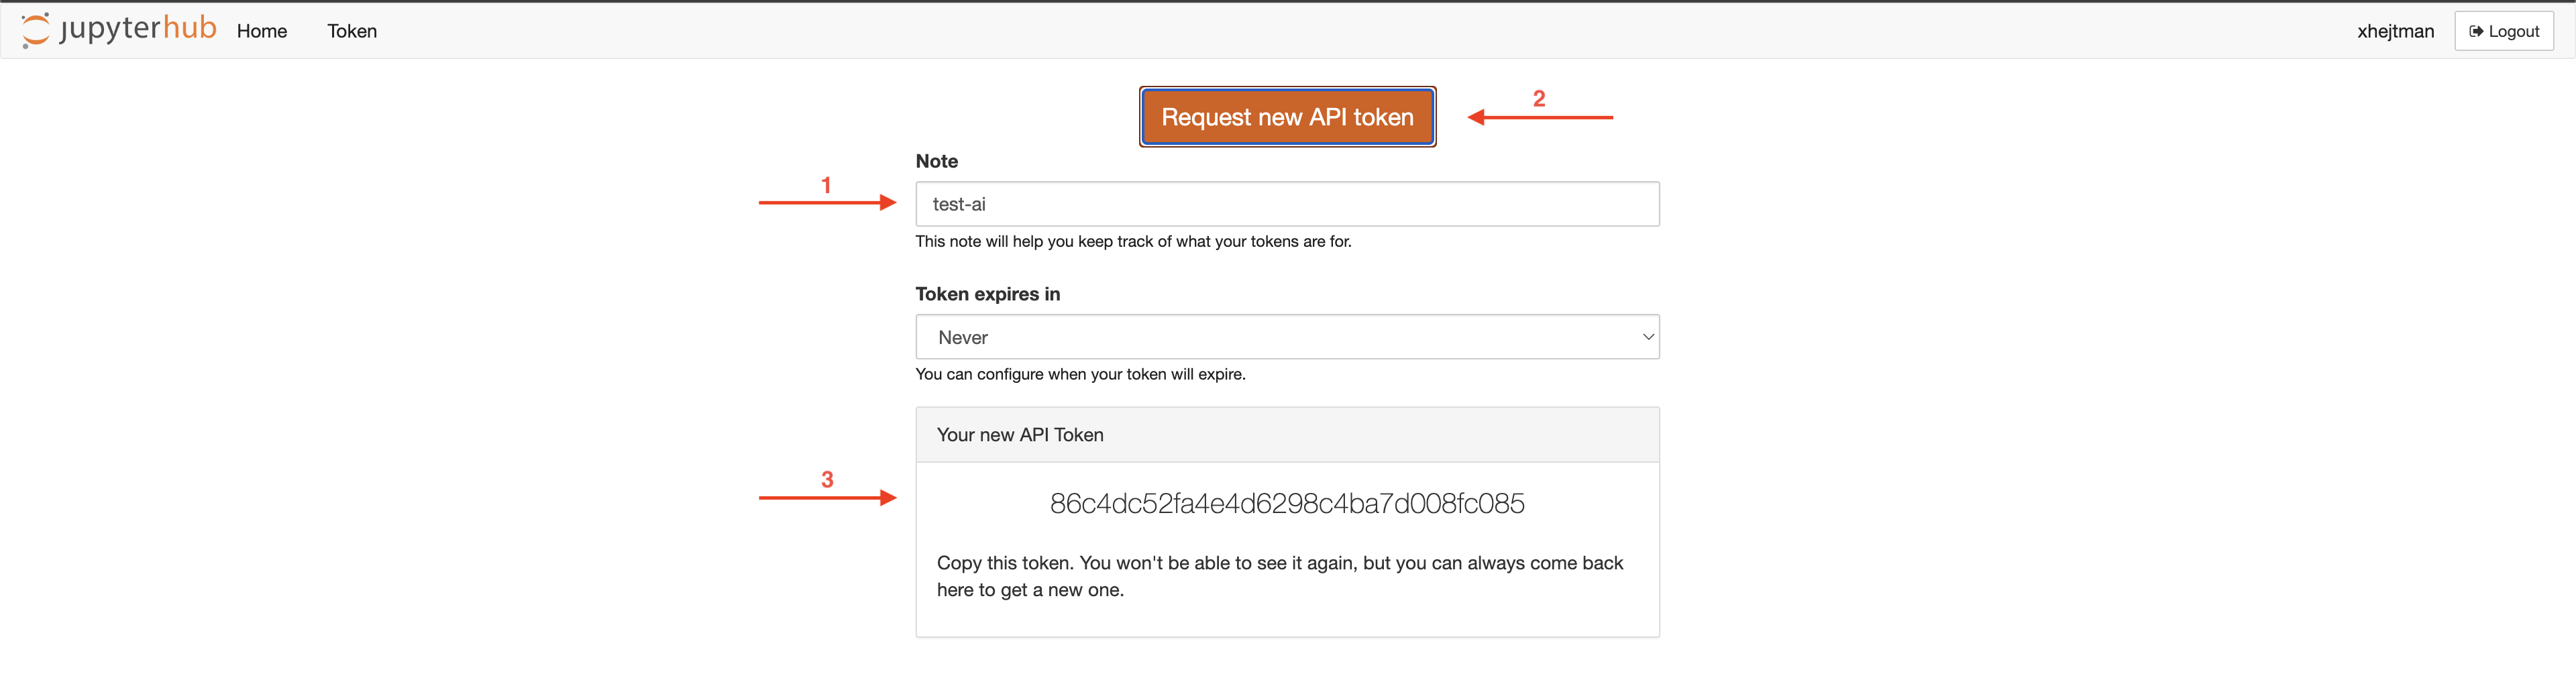
Then put a name for the token (arrow 1 below), hit `Request new API token` button (arrow 2 below), and you will see the token (arrow 3 below):
Check the current URL in your browser, it should look like:

Copy the URL, from the very beginning to the `lab`, including the `lab`, e.g., select the part: `hub.cloud.e-infra.cz/user/xhejtman/AI/lab`. Extend this URL with token as follows:

I.e., add `?token=86c4dc52fa4e4d6298c4ba7d008fc085` (with your token instead of the `86c4dc52fa4e4d6298c4ba7d008fc085`). Send it to friend or open it in another browser.
info: The URL will be redirected so that the part `?token=XXX` is hidden, so you will not be able to copy it again once displayed in the browser.
warning: The token is valid for all your running notebooks, not just for a particular notebook. So be careful when sharing.
warning: The user who wants to use the share link with the token must not be logged in, e.g., must use an incognito browser window.
## Exposing Local Applications
Flare tunnel allows you to expose your local applications on the domain `flare.cloud.e-infra.cz`.
Creating a tunnel:
1. Install the Python package for tunnel management:
```bash
pip install git+https://github.com/CERIT-SC/flare
```
2. Start the application you want to expose.
3. Create a tunnel:
```bash
flare tunnel --port {port} --name {name}
```
where `{port}` is the port on which your application is running, and `{name}` defines the URL where the application will be accessible.\
For example, the following command will expose an application running on port `8888` at the URL `https://myapp.flare.cloud.e-infra.cz`:
```bash
flare tunnel --port 8888 --name myapp
```
## Special Features
### New Feature Requests
Any tips for features or new notebook types are welcomed at IT Service desk.
### AI GPT Chat Support
Some of the notebooks (marked with `AI`) are integrated with GPT, in particular the gpt-4o-mini model. Each user has access to prepaid the model with the following restrictions:
* The model can only be used from the jupyterhub (the API key will not work anyway).
* The user can currently spend $1 per month (for the gpt-4o-mini model, the limit is for 1.3M input+output tokens).
* Using the GPT requires the user to agree to the [OpenAI terms of use](https://openai.com/policies/terms-of-use/).
* Only the `gpt-4o-mini` and `gpt-4o` models are supported.
warning: Your data will be sent to the third party service -- OpenAI. If you do not agree, do not use AI versions of notebooks.
#### Currently Integrated Notebooks
* Minimal NB AI -- see [https://jupyter-ai.readthedocs.io/en/latest/](https://jupyter-ai.readthedocs.io/en/latest/) for documentation.
* RStudio with R 4.4.1 and AI -- see [video](https://www.youtube.com/watch?v=rZB0_53Cm1w) for features. Note: the `gptstudio` package is already installed in the image.
### Conda Environment
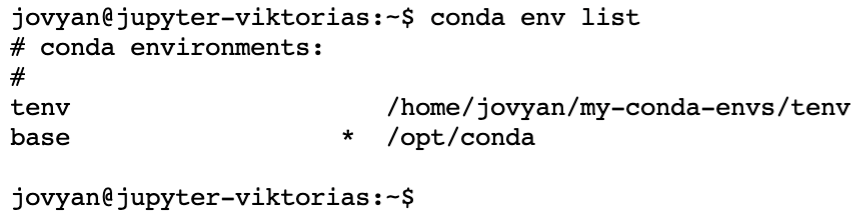
Conda is supported in all provided images and is activate using `conda init`. New conda environment terminal is created in notebook's terminal with command `conda create -n tenv --yes python=3.8 ipykernel nb_conda_kernels` (`ipykernel nb_conda_kernels` part is required, alternatively irkernel).

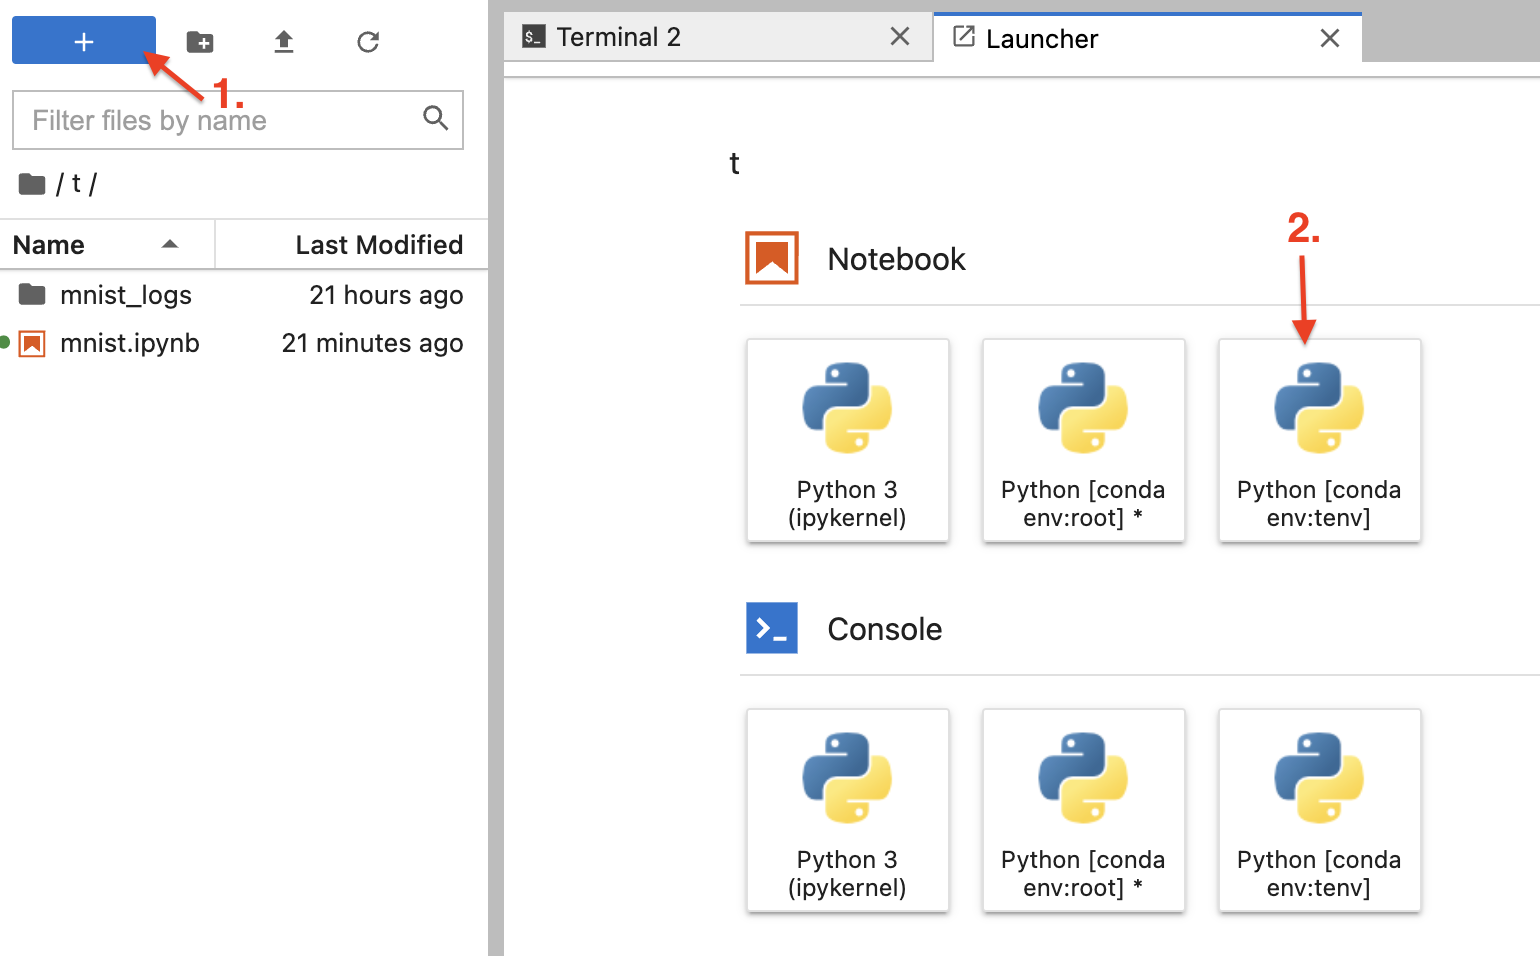
Check if environment is installed with `conda env list`. You can use the environment right away, either by creating new notebook or changing the kernel of existing one (tab `Kernel` → `Change Kernel...` and choose the one you want to use).
#### Install Conda packages
To install conda packages you have to create new conda environment (as described above). Then, install new packages in terminal into newly created environment e.g. `conda install keyring -n myenv`.
Open new notebook and change the kernel in tab `Kernel` → `Change Kernel...` → `myenv` (or the nemae of kernel you installed packages into).
## Building Own Image
The best and easiest way for building custom image is to base minimal notebook from jupyterhub `jupyter/minimal-notebook:hub-4.0.2` and do necessary changes. Source for our Minimal notebook can be found [here](/examples/ceritsc/jupyterhub/Dockerfile-minimal).
If for any reason, it is not desired to source this minimal notebook, you can create a new one from any base, but make it sure it is ready to run as notebook:
* Install `jupyterlab` package
* Add [start-notebook.py](/examples/ceritsc/jupyterhub/start-notebook.py), [start-notebook.sh](/examples/ceritsc/jupyterhub/start-notebook.sh), [start-singleuser.py](/examples/ceritsc/jupyterhub/start-singleuser.py), [start-singleuser.sh](/examples/ceritsc/jupyterhub/start-singleuser.sh), [start.sh](/examples/ceritsc/jupyterhub/start.sh) files to `/usr/local/bin` and make them executable `chown a+rx start*`
* Make sure, that these `start` files are not eddited on Windows and having Windows new lines. Google for solution by requesting: windows vs unix newline.
## SSH Access to JupyterNotebook
warning: SSH access works only from IPv6 enabled networks. It will not work from IPv4 only network -- most home networks, you usually will need to use VPN service such as Edu VPN.
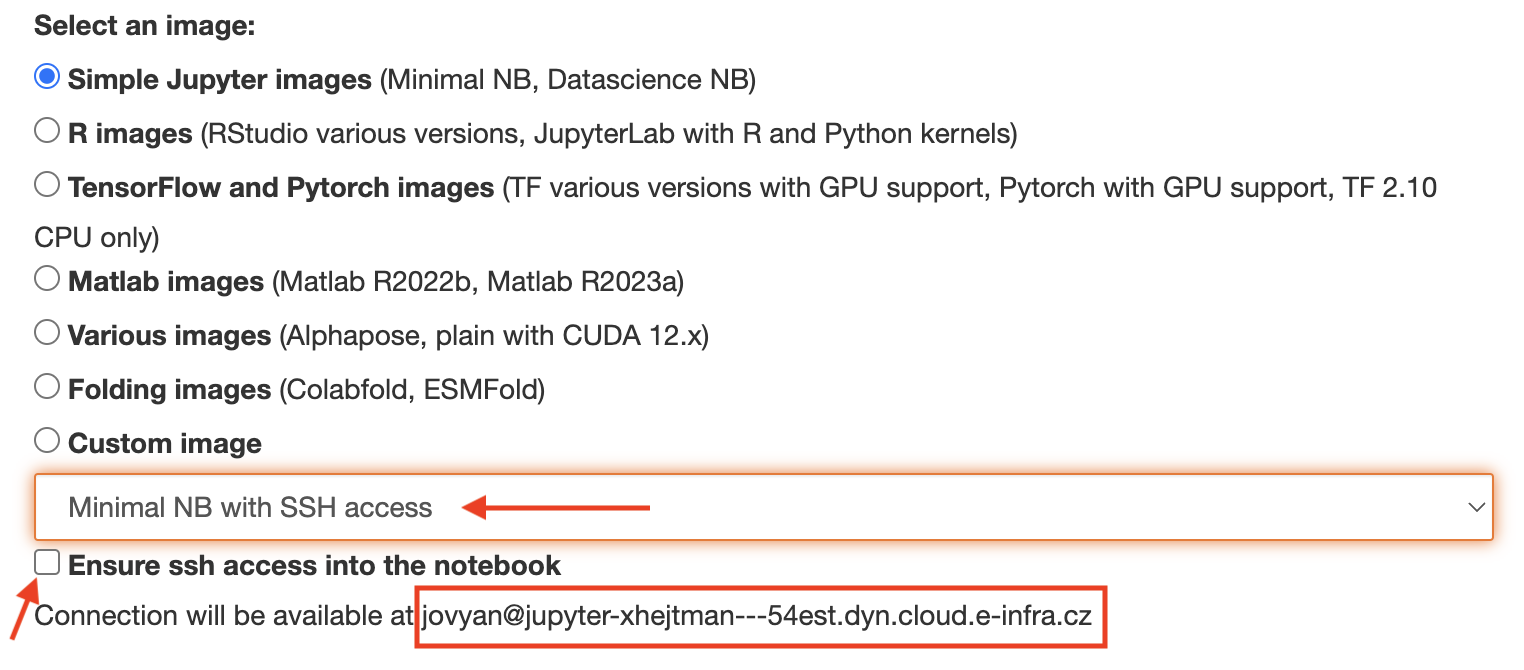
It is possible to enable SSH access at notebook startup, you need to use an image that contains `sshd` with correct settings, currently `Minimal NB with SSH access` image is available.
As shown below, ssh enpoint address will be displayed, `jovyan@jupyter-xhejtman---54est.dyn.cloud.e-infra.cz` in this example. Write this address because Jupyterhub UI will not display this address again. It can be obtained by `kubectl get svc -n jupyterhub-[yourlogin]-prod-ns -o yaml | grep external-dns.alpha.kubernetes.io/hostname`, if the `kubectl` tool is installed in the notebook.
### SSH Keys
Additionally, you need to add your (from your laptop) *public* ssh key into the Jupyter Notebbok, into the file `/home/jovyan/.ssh/authorized_keys` file. If the directory `.ssh` does not exist in the jovyan home, create it using `mkdir .ssh`. Do not omit the dot at the beginning of the name. Also note, `ls` does not display doted files, to see `.ssh` directory, you need to use `ls -a`.
If you don't have ssh key-pair generated on your laptop, you can use command `ssh-keygen -b 4096 -t rsa`. Generated keys will be saved in `[HOME]/.ssh/id_rsa` (private part) and `[HOME]/.ssh/id_rsa.pub` (public part).
After adding the public ssh key into Jupyter Notebook home, check if `sshd` process is running by running `ps -fax`. This command will display currently running processes, similar to
```bash
PID TTY STAT TIME COMMAND
163 pts/1 Ss 0:00 /bin/sh
169 pts/1 R+ 0:00 \_ ps -fax
1 ? Ss 0:00 dumb-init start-notebook.sh --ServerApp.default_url=/lab --ServerApp.max_body_size=16291456000
7 ? Ssl 0:04 /opt/conda/bin/python3.11 /opt/conda/bin/jupyterhub-singleuser --ip=0.0.0.0 --ServerApp.default_url=/lab --ServerApp.max_body_size=16291456000
96 pts/0 Ss+ 0:00 \_ /usr/bin/sh -l
25 ? Ss 0:00 sshd: /usr/sbin/sshd [listener] 0 of 10-100 startups
```
If you can't see `sshd` process running (last line), run command `/usr/sbin/sshd` in the Jupyter Notebook terminal. It is possible you will get warning about OpenSSL version mismatch which should not prevent `sshd` from starting. If you get this warning, check output of `ps -fax` and if `sshd` process is running, everything is functional despite the warning.
At this point, you should be able to connect with ssh similarly to `ssh jovyan@jupyter-xhejtman---54est.dyn.cloud.e-infra.cz`.
info: The ssh will print warning about changed ssh key sometimes (mainly after restarting the notebook), this is ok, using the SSH key.
DO NOT IGNORE THIS WARNING WHEN ENTERING A PASSWORD.
### Creating Own SSH Enabled Image
You can easily base our minimal notebook image with the name: `cerit.io/hubs/minimalnb:26-09-2024-ssh`. Or you can create your own from scratch. Follow the guidelines above, how to create own notebook image and additionally install `openssh-server` package.
Put the following configuration into `/etc/ssh/sshd_config.d/sshd.conf` or if your base distribution does not use `/etc/ssh/sshd_config.d` then just to `/etc/ssh/sshd_config`:
```ini title="sshd.conf"
Port 2222
AddressFamily any
ListenAddress 0.0.0.0
ListenAddress ::
StrictModes no
PubkeyAuthentication yes
UsePAM yes
X11Forwarding no
PrintMotd no
TCPKeepAlive yes
PubkeyAcceptedKeyTypes +ssh-rsa
```
Also remove all `/etc/ssh/ssh_host_*` files in the image.
warning: It is crucial to remove the `ssh_host_*` files from the image and create new files during image start. Otherwise the ssh connection is not secure!
The last step is to edit original `start-notebook.sh` file located in the image in `/usr/local/bin/start-notebook.sh` and add lines:
```bash
(export LD_LIBRARY_PATH='';
rm -f /etc/ssh/ssh_host_*;
for i in rsa dsa ecdsa ed25519; do
ssh-keygen -q -f /etc/ssh/ssh_host_${i}_key -N '' -t $i;
ssh-keygen -f /etc/ssh/ssh_host_${i}_key.pub;
done)
LD_LIBRARY_PATH='' /usr/sbin/sshd
```
the whole file should look like this:
```bash title="start-notebook.sh"
#!/bin/bash
# Shim to emit warning and call start-notebook.py
echo "WARNING: Use start-notebook.py instead"
(export LD_LIBRARY_PATH='';
rm -f /etc/ssh/ssh_host_*;
for i in rsa dsa ecdsa ed25519; do
ssh-keygen -q -f /etc/ssh/ssh_host_${i}_key -N '' -t $i;
ssh-keygen -f /etc/ssh/ssh_host_${i}_key.pub;
done)
LD_LIBRARY_PATH='' /usr/sbin/sshd
exec /usr/local/bin/start-notebook.py "$@"
```
## Run Job From Notebook
Jupyter Notebooks are great tool for interactive computing but sometimes your scripts can include a portion that is more resource-intensive. In this case, it is preferred to run this portion as a `Job` rather than inside the Notebook. Some of the reasons are:
1. You have to allocate a lot of resources for notebook even though most of the time, you don't need them.
2. If the computation is too demanding, you might not be able to interact with the notebook environment because allocated reosurces are consumed by the computation → you can't interactively analyse the data from the notebook
### Neccesary Tools
info: We are actively working on reducing the amount of steps that must be taken.
To run a job, you need to install a tool `kubectl` inside your notebook.
For RStudio-based images:
* Open terminal and run
`curl -LO "https://dl.k8s.io/release/$(curl -L -s https://dl.k8s.io/release/stable.txt)/bin/linux/amd64/kubectl"`
* If you get error `curl: command not found` then perform
```
fakeroot apt-get update
```
wait till update finishes
```
fakeroot apt-get install curl
```
and execute above-mentioned curl again
* Execute
```
fakeroot install -o rstudio -m 0755 kubectl /usr/local/bin/kubectl
```
* Execute
```
export KUBERNETES_PORT=tcp://10.43.0.1:443 KUBERNETES_PORT_443_TCP=tcp://10.43.0.1:443 KUBERNETES_PORT_443_TCP_ADDR=10.43.0.1 KUBERNETES_PORT_443_TCP_PORT=443 KUBERNETES_PORT_443_TCP_PROTO=tcp KUBERNETES_SERVICE_HOST=10.43.0.1 KUBERNETES_SERVICE_PORT=443 KUBERNETES_SERVICE_PORT_HTTPS=443
```
* Now you can use `kubectl` to interact with resources in your namespace. Verify with:
```
kubectl get pods
```
which will return list of your running notebooks.
### Sharing The Data From Notebook To Job
It is probable that you would like to reuse the data (or script) located in your Jupyter Notebook instance in the `Job`. As `Job` is a new object, you must attach the data to it.
Your notebook can mount two different so-called `volumes` that are shareable:
1. Your notebook has a persistent volume mounted to `/home/jovyan` (or `/home/rstudio`) which is internally realized by an object called `PersistentVolumeClaim`. This object has a nice feature - it can be reused and mounted to any other Notebook or Job to any path.
2. If you chose to mount your metacentrum home (mounted to `/home/meta/[your_meta_username]`), another `PersistentVolumeClaim` object has been created for the home. This object can be reused and mounted to any other Notebook or Job to any path too.
To later use these two objects (`PersistentVolumeClaims` = PVCs) , you need to know their names:
1. Find out the name of PVC mounted to `/home/jovyan` (or `/home/rstudio`) by issuing command
```
kubectl get pvc | awk -v volume=$(df -h | awk '$1 ~ /^147\.251\.6\.218:/ {split($1, a, "/"); print a[length(a)]}') '$3 == volume {print $1}'
```
e.g.
```
rstudio@jupyter-testuser--pipemaster2:~$ kubectl get pvc | awk -v volume=$(df -h | awk '$1 ~ /^147\.251\.6\.218:/ {split($1, a, "/"); print a[length(a)]}') '$3 == volume {print $1}'
testuser-home-pipemaster <---- NAME OF THE PVC MOUNTED TO /home/rstudio
```
2. Find out the name of PVC mounted to `/home/meta/[your_username]` by issuing two commands:
2.1 First, see what storage you mounted. If you didn't mount any meta storage, the output will be empty.
```
df -h | awk '$NF ~ /^\/home\/meta/ {match($1, /@([^:]+):/, m); print m[1]}'
```
e.g.,
```
rstudio@jupyter-testuser--pipemaster2:~$ df -h | awk '$NF ~ /^\/home\/meta/ {match($1, /@([^:]+):/, m);
print m[1]}'
storage-brno2.metacentrum.cz <---- MOUNTED META STORAGE
```
2.2 Secondly, get the PVC name for metacentrum home by issuing command and matching its name with your chosen storage match with the storage name such as `brno2, brno12, plzen1, ...`
```
kubectl get pvc | awk '$3 ~ /-data-sshfs$/ {print $1}'
```
e.g.
```
rstudio@jupyter-testuser--pipemaster2:~$kubectl get pvc | awk '$3 ~ /-data-sshfs$/ {print $1}'
testuser-brno12-cerit-claim
testuser-brno2-claim <---- THIS IS THE ONE because mounted meta home is storage-brno2.metacentrum.cz
```
Now you should know the names of the objects that we will use as volume mounts in the next Section on creating the Job itself.
### Creating The Job
In the `Job`, you will need to provide 4 things:
1. Image name to run
2. Script/Command to start
3. Resources
4. Volumes to Mount
#### Image
Job must start with some image. You should create a Docker image that will include all necesarry libraries your script requires or software you want to run to process the data.
#### Script
Script can be built into the image or you can run script located in the mounted volumes (so from the PVCs we mentioned above).
If you interacted with the Notebook and you saved a script you would like to run as a Job in a path `/home/rstudio` (`/home/jovyan`) or in you meta home, you will be able to run this script in the Job, if the volume is mounted (more below)
#### Resources
You will need to specify what memory and CPU resources your Job needs.
#### Volumes to Mount
You can specify, if you want to mount any of the two PVCs from section above (so persistent home or metahome) to your Job. Generally, it makes sense to mount both (if you use Meta home) because you can directly share the data between Meta home, Notebook and Job. Moreover, the Job can write its outputs to either Meta home or Notebook's home dir which makes it easier for you to work with outputs (does not require any copying)
## Error Handling
You receive *HTTP 500:Internal Server Error* when accessing the URL `/user/your_name`. Most likely, this error is caused by:
1. You chose MetaCentrum home you haven't used before -- The red 500 Error is followed by `Error in Authenticator.pre_spawn_start`
2. You chose MetaCentrum home you don't have access to -- The red 500 Error is followed by `Error in Authenticator.pre_spawn_start`
3. While spawning, `Error: ImagePullBackOff` appears
Solutions:
1. Log out and log in back
2. You can not access the home even after logging out and back in -- you are not permitted to use this particular home
3. Clicking on small arrow `Event log` provides more information. Most certainly, a message tagged `[Warning]` is somewhere among all of them and it provides more description. It is highly possible the repo and/or image name is misspelled.
* please wait for 10 minutes
* The service has a timeout of 10 minutes and during this time, it is trying to create all necessary resources. Due to error, creation won't succeed and after 10 minutes you will see red progress bars with message `Spawn failed: pod/jupyter-[username] did not start in 600 seconds!`. At this point, it is sufficient to reload the page and click on `Relaunch server`.
If you are not sure about how to create an image for your `Job` or have any other questions, contact us at **[k8s@cerit-sc.cz](mailto:k8s@cerit-sc.cz)**.